


The Cutlery Box/ Clutter Box Layout
An 09scale 15inch gauge layout employing techniques for a future layout
Well it?s been a while since I have been able to post anything. I had planned to build an almost scale layout of the Groudle Glen, unfortunately this is on hold. This is due to not really knowing much about the scale and format of the build. I have decided to try a small compact layout first; this will employ all the skills I need to build the Groudle Glen layout at a later date. These skills include making my own track, fabricating buildings and scenery and wiring up the layout to an exhibition standard.
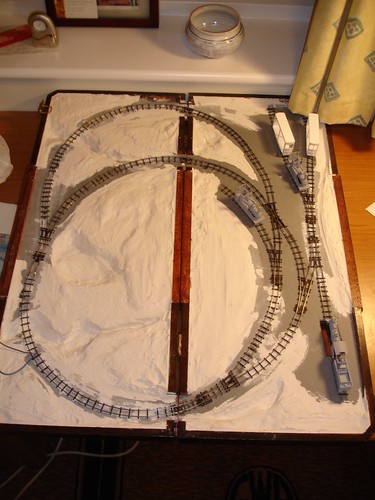
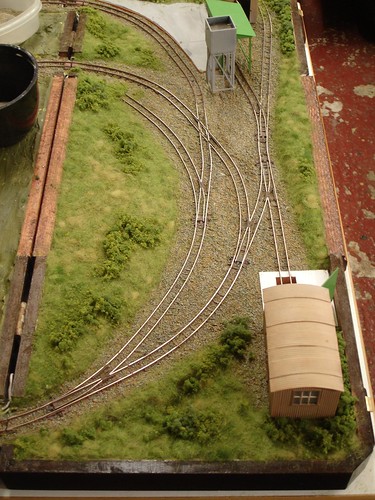
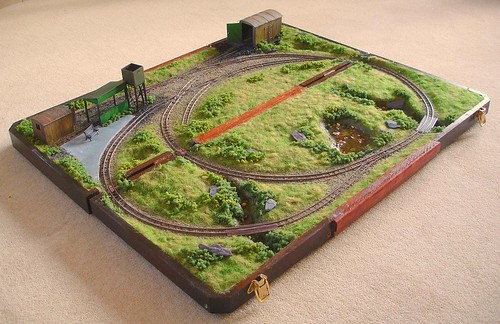
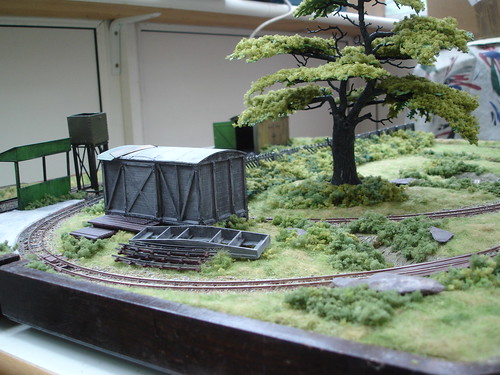
My previous 7mm layout Hockenhull Platts certainly proved usefully but I really want to hone my skills and also have the pleasure of using the layout rather than it collecting dust! It only sees the light of day when I have a little bit of room to get it out. So with this in mind I toyed with the idea of a suitcase layout but there were problems. The tightness of the curves prevented me running my Groudle Glen locomotives, there really wasn?t much scope for operation and above all it would not be strong or durable enough. Then a chance discovery at a junk shop gave me an idea. I would build a folding layout inside a cutlery box. I could have a good operating layout in a minimum space and try all sorts of modelling techniques. Now some people may suggest a plank layout but I was keen to build something that resembled a 15inch pleasure layout similar to Colin peeke?s shifting sands but also have a continuous run. After much experimentation as you can see below, I decided to modify the box to accommodate a layout with some operating interest. (The jouef curves were too tight for my stock)
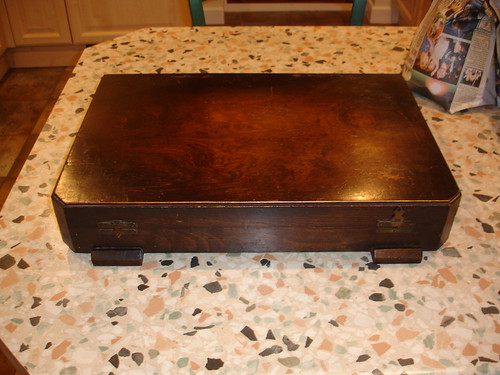
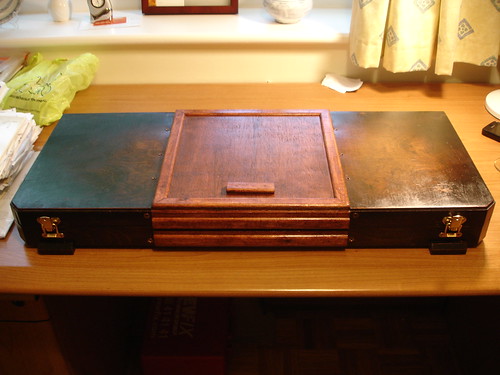
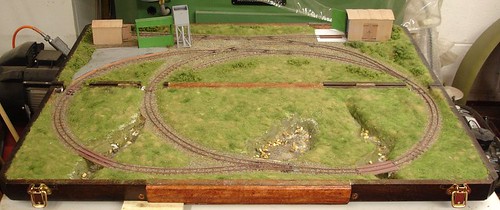
The box was modified by inserting an extra middle section, this not only strengthened the box but also allowed me to bolt better hinges on and ensured that when opened the layout was straight, flat and true. The base boards are sunk just over a 1cm down which will allow scenery to be added and prevent it getting crushed when the box is closed. Trees buildings and other features will be removable. I made sure the outside of the box remained presentable so it could be displayed in the house rather than at the bottom of the cupboard! The box only measures 77cm x 33cm when closed which also makes it ideal to transport, maybe in the future to shows?
A final word, I must thank members of the site especially Invercoy, Puddley Wonderer and Comer Lad for the information and images they have sent me. This has not gone to waste as I have drawn out all the Groudle Glen stock and purchased all the chassis to commence their builds. I will be building all the GGR stock for this layout as well as some 15inch gauge locomotives for fun.
Next step is track construction and some modifications to the baseboards
An 09scale 15inch gauge layout employing techniques for a future layout
Well it?s been a while since I have been able to post anything. I had planned to build an almost scale layout of the Groudle Glen, unfortunately this is on hold. This is due to not really knowing much about the scale and format of the build. I have decided to try a small compact layout first; this will employ all the skills I need to build the Groudle Glen layout at a later date. These skills include making my own track, fabricating buildings and scenery and wiring up the layout to an exhibition standard.
My previous 7mm layout Hockenhull Platts certainly proved usefully but I really want to hone my skills and also have the pleasure of using the layout rather than it collecting dust! It only sees the light of day when I have a little bit of room to get it out. So with this in mind I toyed with the idea of a suitcase layout but there were problems. The tightness of the curves prevented me running my Groudle Glen locomotives, there really wasn?t much scope for operation and above all it would not be strong or durable enough. Then a chance discovery at a junk shop gave me an idea. I would build a folding layout inside a cutlery box. I could have a good operating layout in a minimum space and try all sorts of modelling techniques. Now some people may suggest a plank layout but I was keen to build something that resembled a 15inch pleasure layout similar to Colin peeke?s shifting sands but also have a continuous run. After much experimentation as you can see below, I decided to modify the box to accommodate a layout with some operating interest. (The jouef curves were too tight for my stock)
The box was modified by inserting an extra middle section, this not only strengthened the box but also allowed me to bolt better hinges on and ensured that when opened the layout was straight, flat and true. The base boards are sunk just over a 1cm down which will allow scenery to be added and prevent it getting crushed when the box is closed. Trees buildings and other features will be removable. I made sure the outside of the box remained presentable so it could be displayed in the house rather than at the bottom of the cupboard! The box only measures 77cm x 33cm when closed which also makes it ideal to transport, maybe in the future to shows?
A final word, I must thank members of the site especially Invercoy, Puddley Wonderer and Comer Lad for the information and images they have sent me. This has not gone to waste as I have drawn out all the Groudle Glen stock and purchased all the chassis to commence their builds. I will be building all the GGR stock for this layout as well as some 15inch gauge locomotives for fun.
Next step is track construction and some modifications to the baseboards
_____________________________
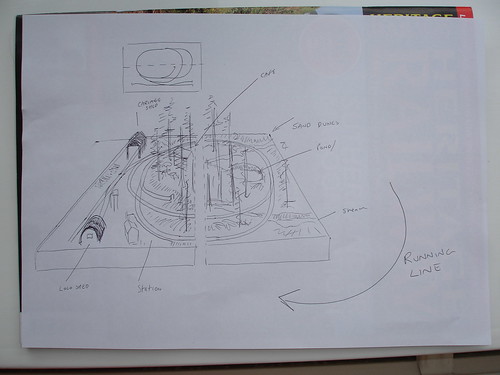
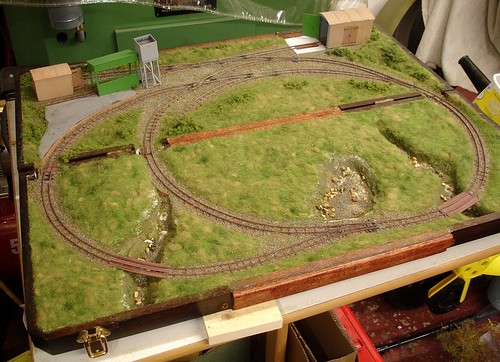
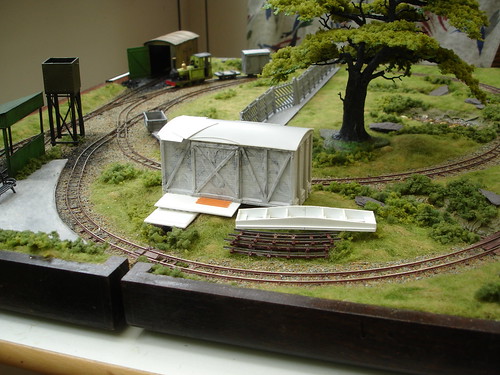
I thought I should post a quick drawing of what the layout will look like. There will be a Locomotive shed and maintenance depot, a carriage works, water tower, station building and cafe/picnic benches in the middle. There will be two bridges and a small pond, the rest of the track will weave through a densely filled forest (perhaps have a feel of Dobwalls) I will probably use a small corrugated shed from my 7mm layout Hockenhull Platts http://ngrm-online.c...?p=26276#p26276 this will also provide the design for the two small bridges. Scenery will made using mini nature products plus some odds and sods from the woodland scenics range.
I have also posted a picture of the basic formers for the landscape. This is all foam board and will be given a top coat of filler today. It looks a bit messy but it?s a tried and tested technique and proves very light.
________________
I have decided that the trees will now be tall pines and old English oaks so you can see through to the back of the layout. They will have to be individually removed but I think this will be the best option, there will probably be only 3 or 5 and they will stick nicely in the foam board base.
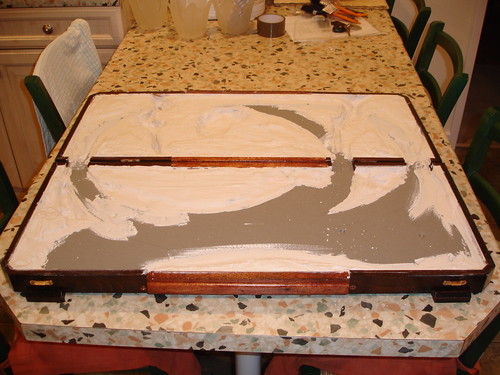
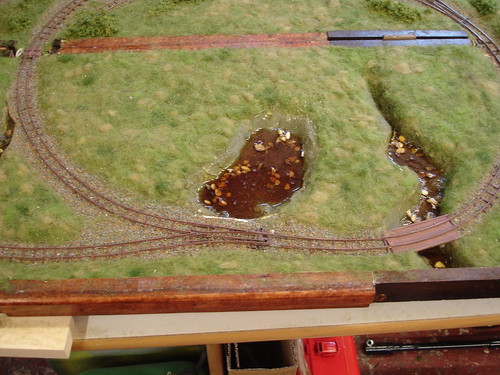
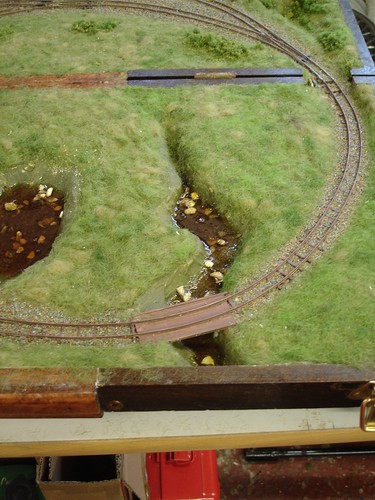
Today I coated the layout in cake mixture. The polyfiller dries hard after an hour or so and proves a rigid and hard wearing base for the scenery. I carefully mapped out the heights so a hill has a dip on the opposite board and visa versa, I don't want to crush anything when it?s closed.
Today I coated the layout in cake mixture. The polyfiller dries hard after an hour or so and proves a rigid and hard wearing base for the scenery. I carefully mapped out the heights so a hill has a dip on the opposite board and visa versa, I don't want to crush anything when it?s closed.
________________
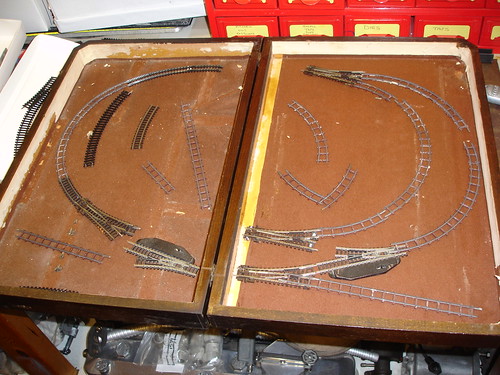
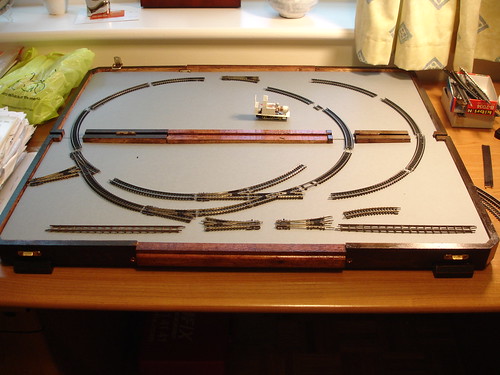
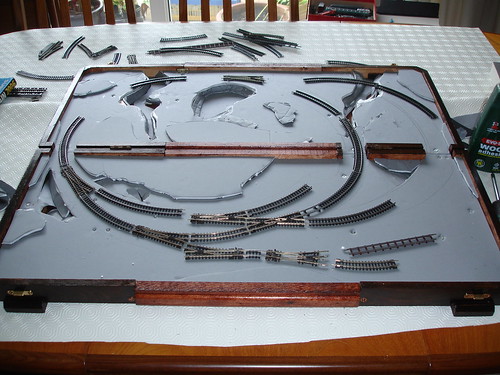
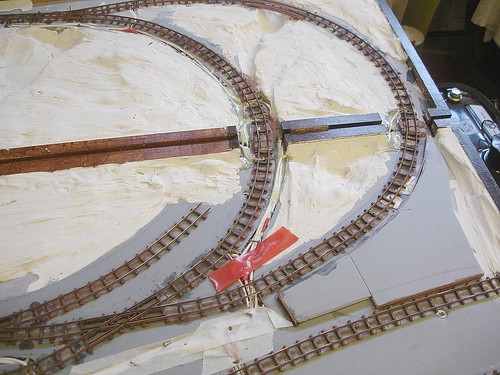
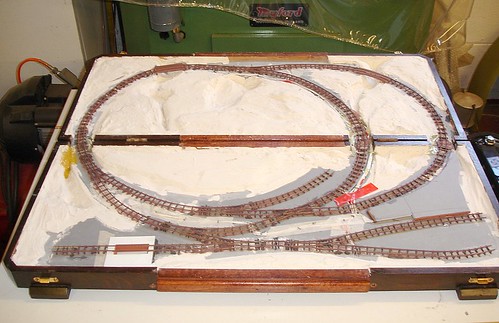
Well after trying out a few experiments I decided the only way to make the track I want will be with PCB sleepers and 009 rail, so that?s cleared up that for the GGR. I will slowly build up the points I need on cut down 4mm sleepers, I think 14 in total over the coming months.
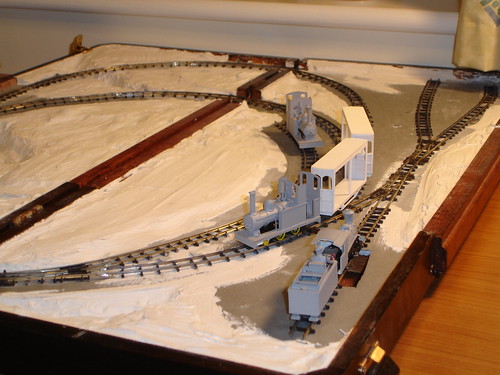
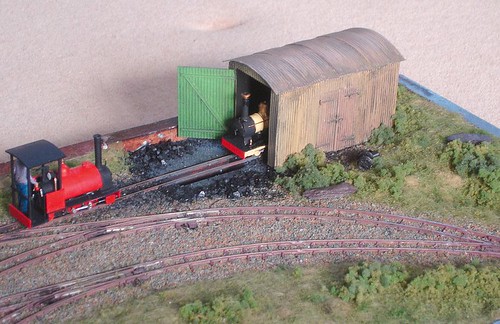
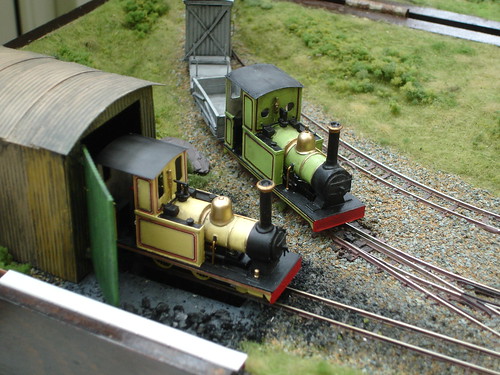
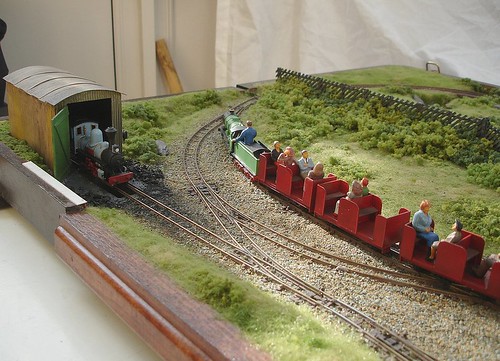
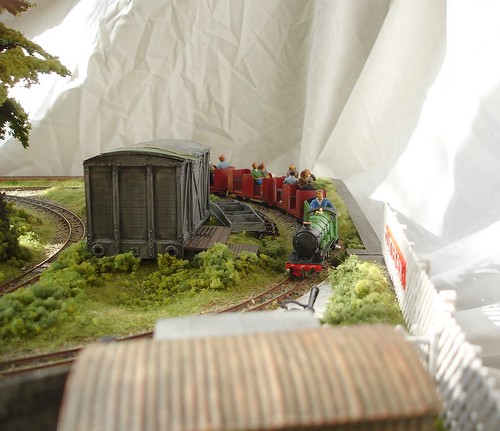
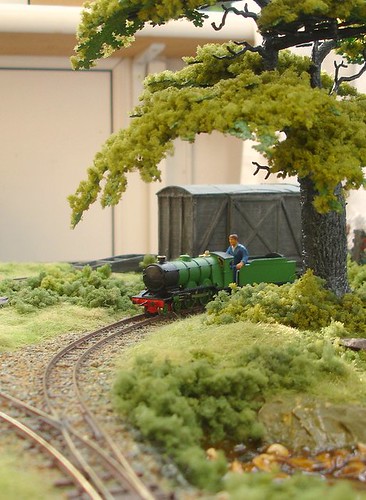
Back to this experiment, I decided to keep the track I had already laid and finish the layout of using the bits of n gauge track I had. Once I had removed the sleepers I didn't need, I began gluing the track to the baseboard. This was quite a time consuming job, using a mixture of set track and some odd bits of flexi track. Once laid I soldered up all the fish plates to ensure conductivity and ran a loco. To my surprise it went around really well. The only problems being where the two boards meet on the hinge. This just required some gentle regauging with some pliers and a light file. The only other problem was my new 2-6-0 American mogul failed to negotiate the curves with its tender so it?s being modified at present. Polar Bear ran effortlessly around which was a relief and with cotton attached pulled two of the GGR coaches around the circuit. For the operator the lines actually quite interesting, twice around each circuit, a little shunting and back into the shed.
Back to this experiment, I decided to keep the track I had already laid and finish the layout of using the bits of n gauge track I had. Once I had removed the sleepers I didn't need, I began gluing the track to the baseboard. This was quite a time consuming job, using a mixture of set track and some odd bits of flexi track. Once laid I soldered up all the fish plates to ensure conductivity and ran a loco. To my surprise it went around really well. The only problems being where the two boards meet on the hinge. This just required some gentle regauging with some pliers and a light file. The only other problem was my new 2-6-0 American mogul failed to negotiate the curves with its tender so it?s being modified at present. Polar Bear ran effortlessly around which was a relief and with cotton attached pulled two of the GGR coaches around the circuit. For the operator the lines actually quite interesting, twice around each circuit, a little shunting and back into the shed.
The next job is add cosmetic sleepers where necessary, paint the landscape, build the bridges and engine pit and spray the track rusty brown. I have also decided that the buildings will be a similar design to the types found on the Manx electric railway (the ones with logs struck to the side)
_________________
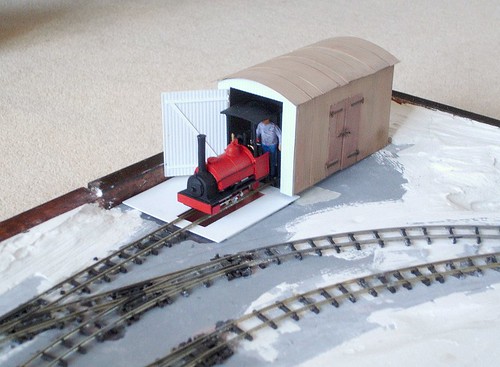
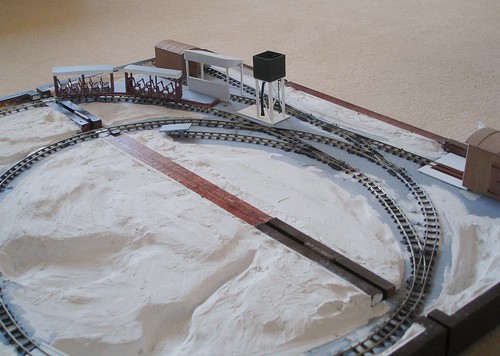
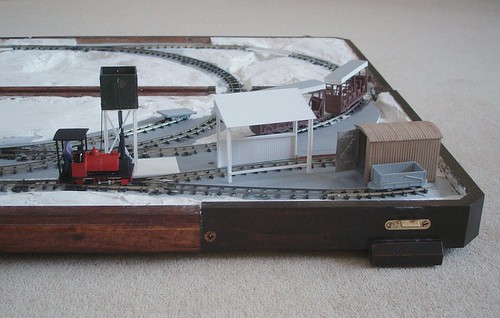
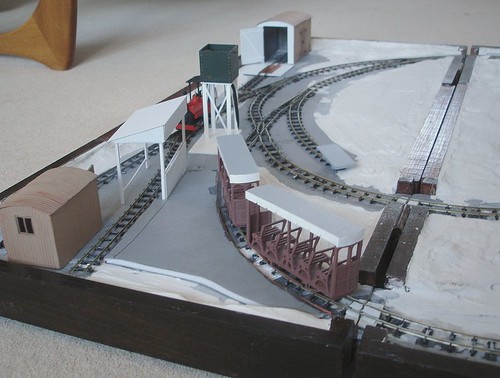
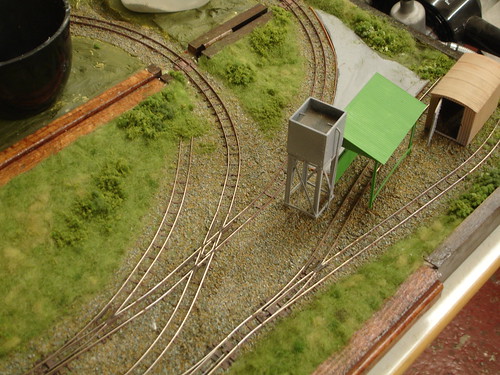
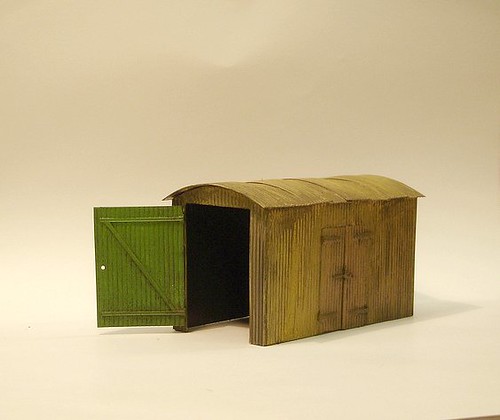
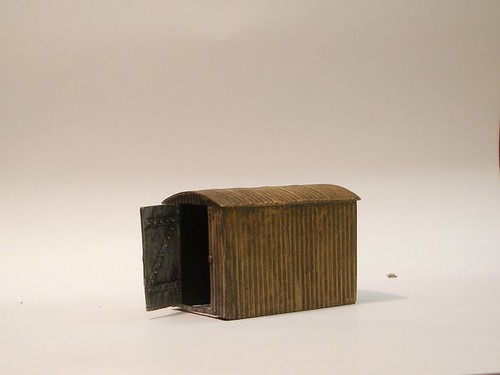
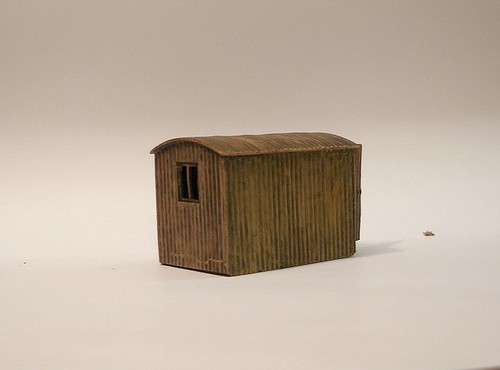
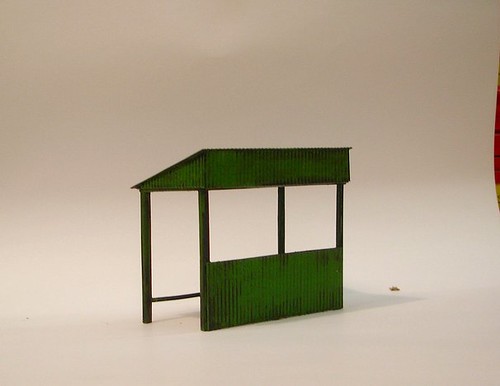
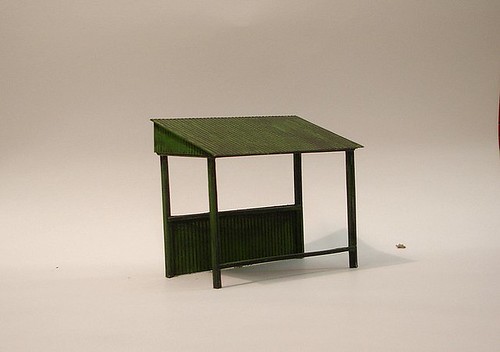
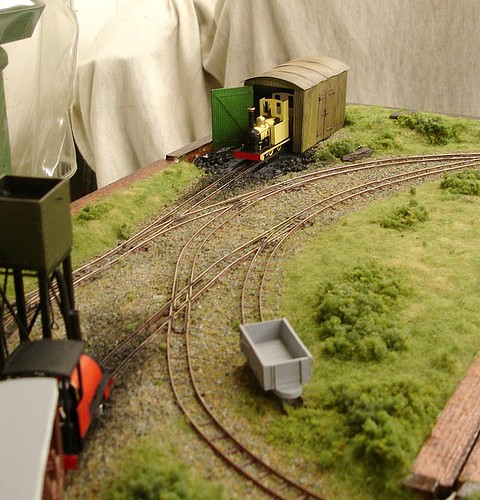
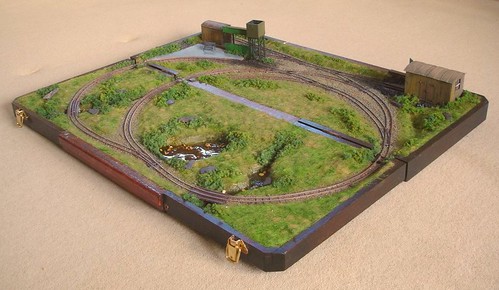
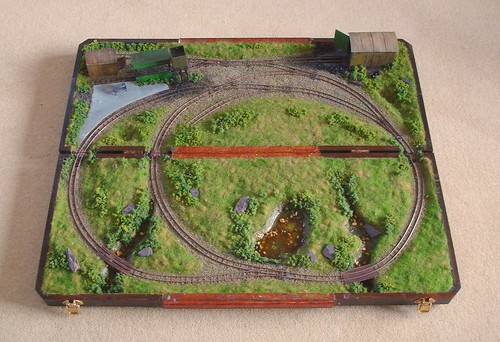
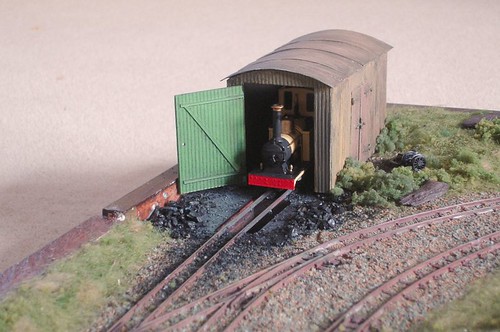
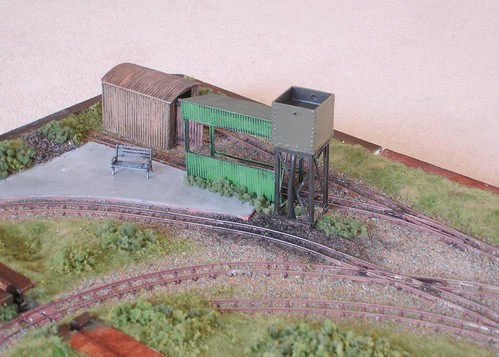
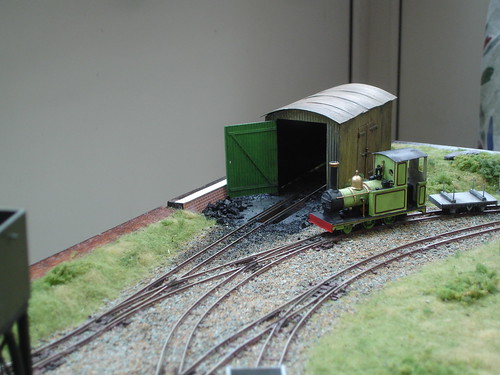
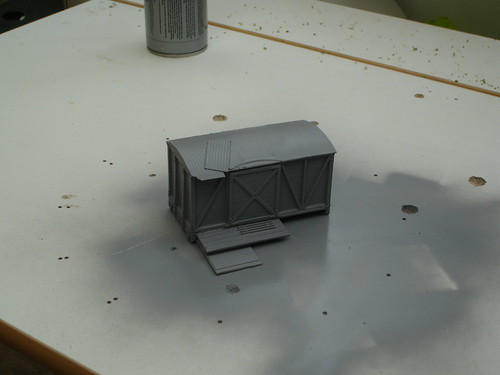
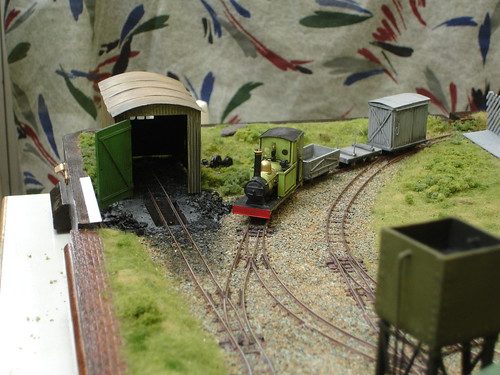
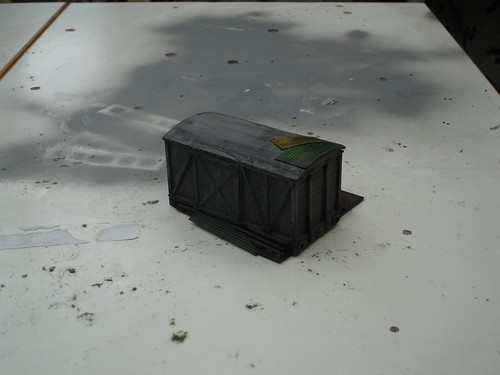
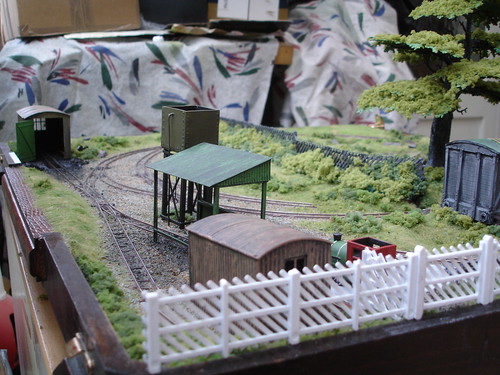
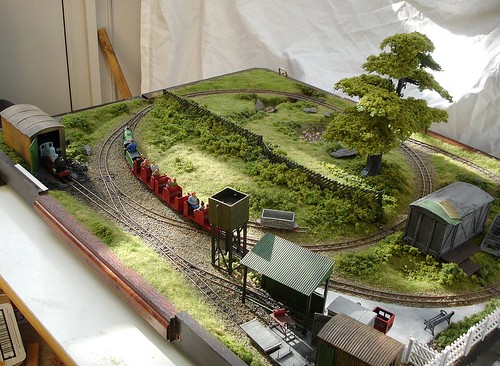
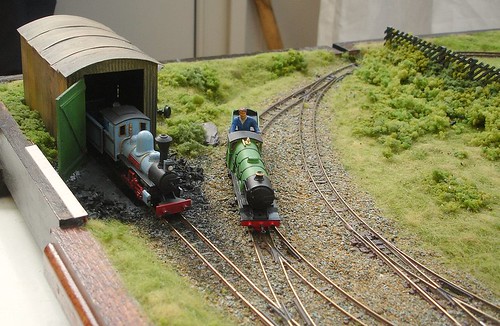
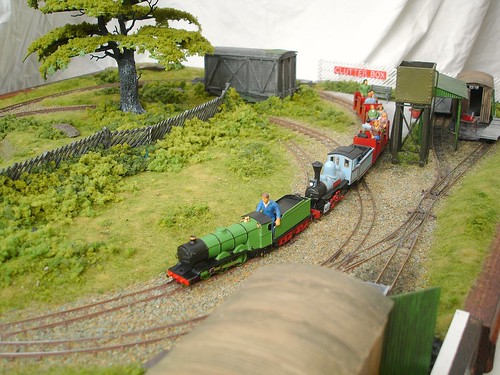
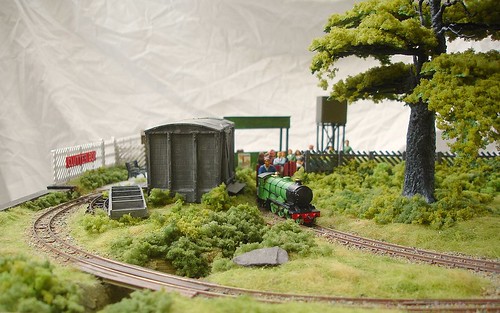
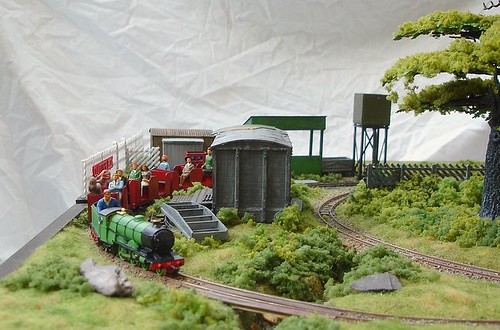
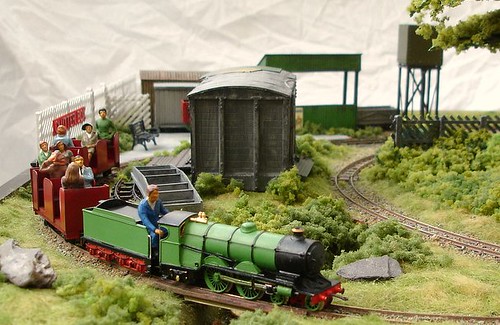
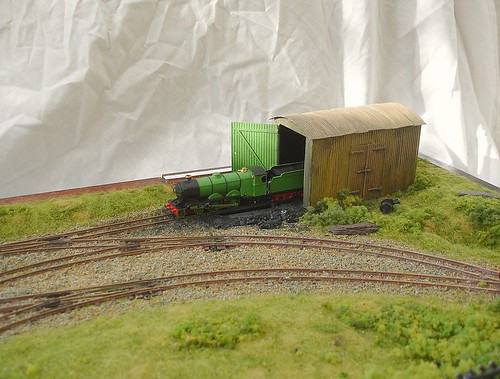
I managed to get a few pictures loaded showing progress on the layout. The buildings are 7mm GWR white metal tin huts, one has been modified with the end removed and built up using plasticard to form the shed. The shelter is made from plasticard strips and slaters corrugated sheet to form a basic structure and the water tower is something made up from a variety of bits I found in a scrap box. I had intended to use the buildings from my previous 7mm layout Hockenhull Plates but they were much to Large. Other details include a platform, two basic bridges made from plastic strip and a locomotive pit by the shed.
I think a small kiosk and coaling stage will be necessary, plus a half completed locomotive in the platform siding just for added interest. I intend to give the yard a simple uncluttered feel and add plenty of detail in the buildings, maybe even lighting them!
Must sort out the wiring today?


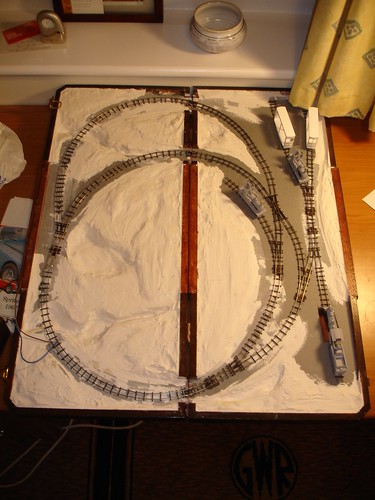
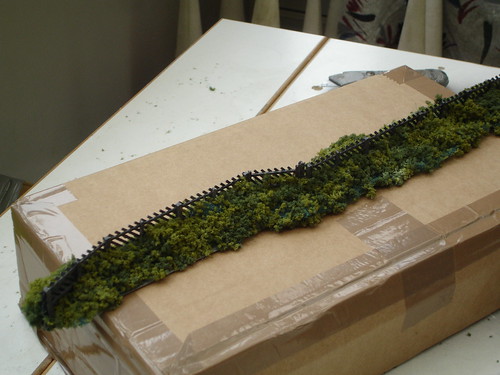
Ok, with the track painted and given a clean all the locomotives ran well around the track. There are a few little niggles but I think this is due to dirty wheel sets and grime on some of the track. I have ballasted the layout this morning using Javis granite and brown stone mixed evenly together. This is now drying after being stuck down with watered down PVA as described by mjcampbell. The yard and junction area has been ballasted right up to the white plaster scenery; this will then be subjected to mini nature weeds left over from Hockenhull Platts Layout. Maybe get some photographs up later of the ballasted track
I am very pleased with the results just need to clean the track and then wait for my mininature to arrive

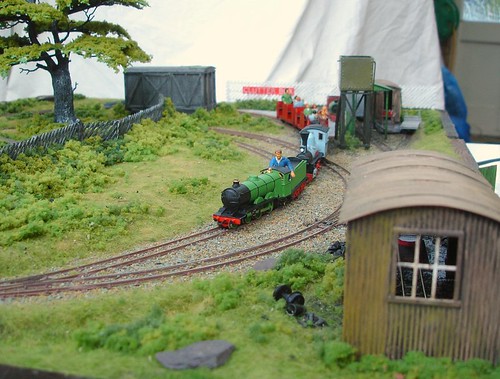
I was able to get some of the scenery started today after a weekend of family commitments. The white poly filler was painted in dark green acrylic as an earth base before a coat of PVA was applied. Gradually a mixture of mini nature winter, spring and autumn grass were teased over the top and patted down. This was quite a time consuming process and needed to be done in shifts throughout the afternoon. I’ve begun adding a few small bushes and shrubs around the ditches and banks just to break up the boards a little. This I must stress is only the start as the scenery will slowly be built up to resemble quite an overgrown 15inch estate/pleasure railway.
I am particularly pleased with the track which has the appearance of light gauge 15inch; it was definitely worth removing all those sleepers and replacing the rusted track! The buildings have had a light coat of primer and will all get a coat of goblin green and then a liberal helping of rust. I still need to add the platform top and finish the inspection pit but I am going to complete the other boards grass section first.
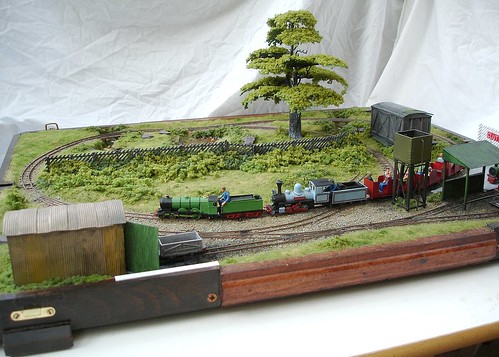
While the first board dries I was able to start work on some of the trees. I’ve never made a tree before so it’s a bit of an experiment. The picture shows the first 4 large trees that stand almost 30cm tall. They were built using garden and electrical wire taped together and given a coat of poly filler. I intend to stick some sea grass I think that’s what it’s called? to the ends and then heavily flock them.
I’ve only used my finger tips and PVA to apply the grass. Basically I mixed 3 different mini nature 4mm grass lengths together in a small tub and then picked it out in small clumps sticking it to the base boards that are covered in PVA. I find that it’s better to add more than you need then pat it all down. I think because it’s mixed and unevenly stuck down the grass gives an impression of rising up. I need to add fixative which is usually hairspray but I might try watered down PVA on a small section to see what happens.
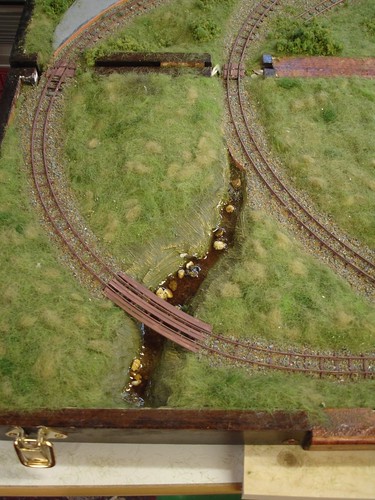
I was able to complete most of the second board tonight, the areas near the pond and stream beds will be done after I have made the water! Unfortunately the trees were a disaster; the wire was too flexible resulting in the ploy filler falling off. They are not beyond repair; I think wrapping them in garden wire should cure this. I must say I am too tired tonight to carry on with things so its off to put my feet up by the fire and get out some books for inspiration!
Well idiot of the New Year Award goes to yours truly.... I decided to tackle the water after opening a pot of varnish... I thought that will do the job looks like water and will dry shiny, perfect. Only problem is I poured a lot into the stream and pond with out considering how long it will take to dry! I also can't move it off the flat surface or it runs everywhere! Doh!
So that’s it for around 2 weeks I think, plenty of time to do some tress, bushes, finish the buildings and have a go at building a kiosk. The stock builds also need to continue so perhaps its good thing water has stopped play. Incidentally I have a burst pipe in the house so I think in future I will stay well away from water….
I had a go at sorting out some of the buildings last night. The shed and hut were originally GWR 7mm white metal kits bought of eBay and modified and the shelter scratch built in plastic. All three were treated to paint and a healthy weathering. Firstly the shed was given a wash of System 3 acrylic black and yellow ochre, this was then wiped off so the dark colours sank into the cracks and grooves. I decided to paint the shed door green to match my shelter but keep the rest of the building in a mixture of shades of yellow ochre. I feel it gives the impression of a some what neglected building. The interior will house a variety of tools and perhaps a dismantled locomotive at the end? Just enough room for something any way…
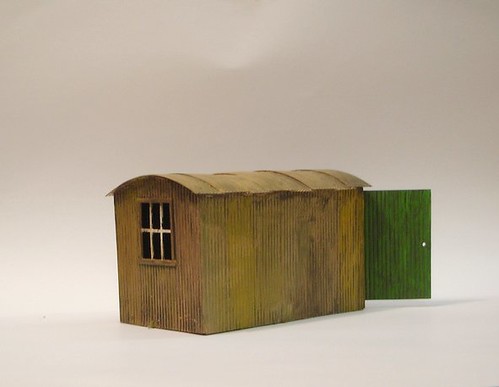
The small hut was again treated in the same manner but given a light dry brush for some variety. The inside of the door will be lightened up a little and will perhaps have notices stuck to it. The interior will contain bits and bobs of permanent way and various cupboards; I also hope to install some lighting to show off some of the detail.
The shelter and water tower have been given a wash with system 3 black, brown and yellow ochre; all applied using a dry brush. I have a mixture of weathering powders to apply to the tank and part of the roof to rust them up a little more. I am keen to give them a slightly neglected look. The shelter looks lopsided in the pictures but this is to account for the raised level of the platform.

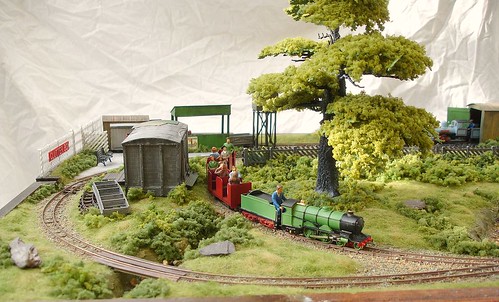
The scenery on the rest of layout took a turn in the right direction tonight. . The pond is still tacky but the streams are dry so I was able to get most of this finished. I was able to add bushes using a variety of foam clumping colours and weather the bridges using black acrylic. I’ve added a number of rocks in various areas of the landscape which came from my 7mm welsh slate wagons! The engine shed pit has been painted and treated to a heavy amount of coal and ash. This was also repeated in areas where locomotives will be stationary for short periods
Next job is sort out the interiors and get the platform and kiosk made. I couldn’t rest a few photos with some of the stock, I can’t wait to get things running! I will get some better pictures of the layout on Sunday, the garage is a little to dark
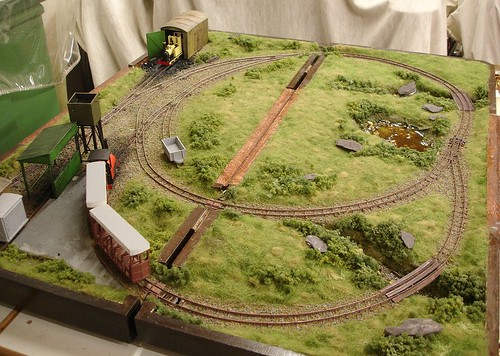
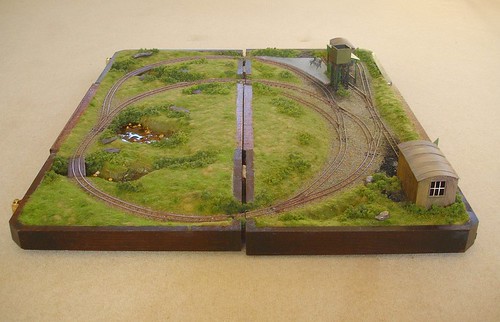
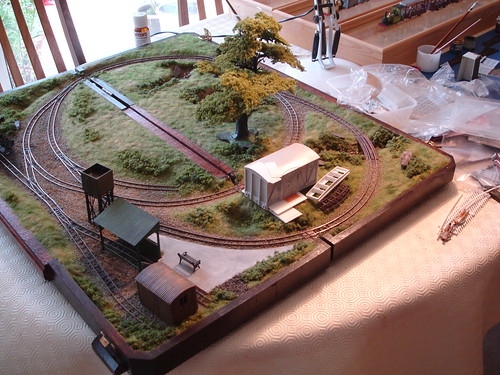
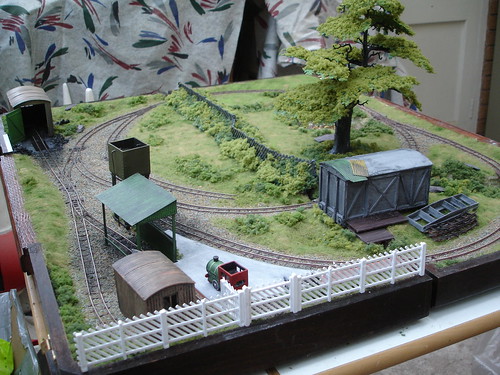
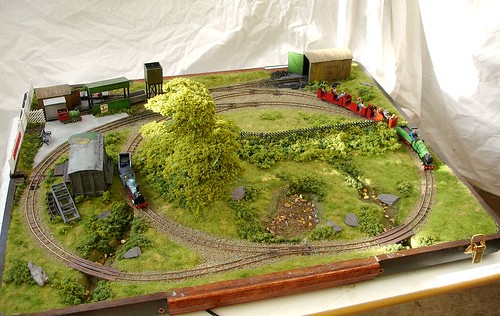
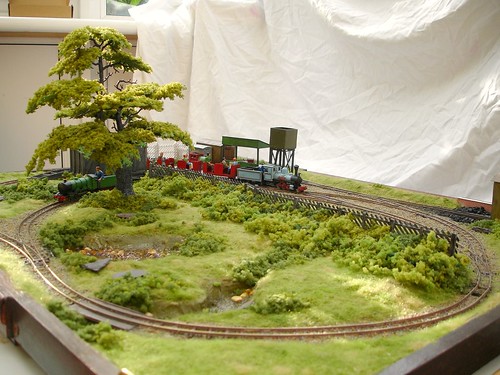
I have attached a number of photographs that show the whole layout with everything in place. Jobs that now need doing now are
1. Scenic break in the middle
2. Finish ponds and streams
3. Make some decent trees 
4. Build a kiosk
5. Paint some people up
6. Add interiors to buildings
7. Add lights to buildings
8. Detail up yard with odd machinery etc
9. Finish stock builds
10. Add point levers.
11. Remake water tower mid frame (bit too fat0
12. Put in brick wall by shed.
Maybe then I can play trains!

The shed needs a wall added to the left to hide the base board and I think I might add some shovels and buckets.
The station is very basic with a bench and a kiosk when built
Thats it for a few weeks as I am away with work but that shouldn't stop the stock builds
Oh Dear... 3 months have passed and I have done nothing.. As with most things from time to time other jobs get in the way and have prevented any progress on the layout till today. I must confess I lost interest on the project, a little while ago I did some G scale modeling and found going back to this scale a bit too fiddly.
Well that has all changed. I decided that I must finish the railway off and have begun in earnest to get the job completed over the next 2 months. So far I have added a small wall by the engine shed and started to cover the hinged section of the layout. The centre divide is made up of slaters fencing that will then have plenty of bushes and shrubs to disguise its base. Its not straight as it’s hoped that it will create a sufficient divide between the front and rear board, or is that rear and front board!
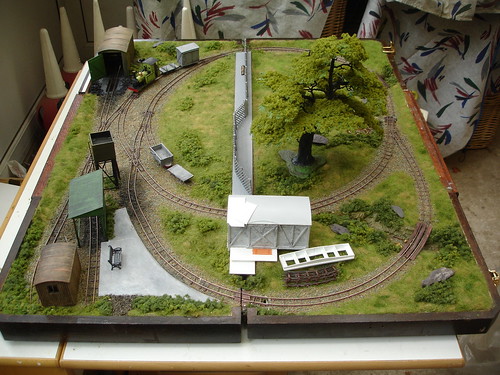
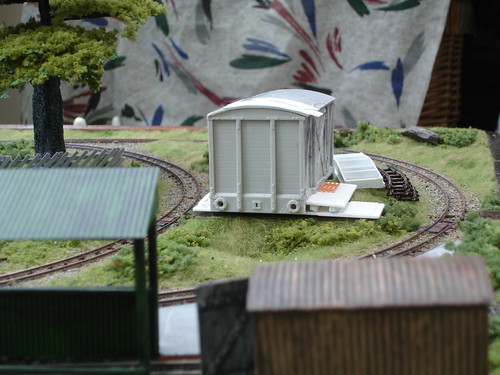
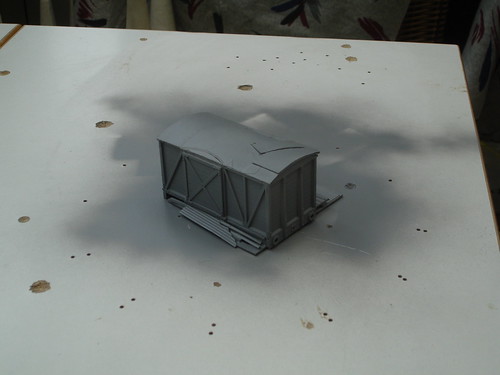
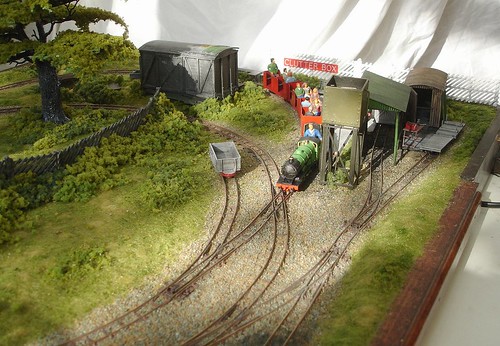
Next job to consider was the hinged section by the station. I had thought of continuing the fence and then adding gates similar to the Eaton hall railway as it enters the park land but this was too much I thought. Next idea came in the form of a slaters grounded body I had bought for Hockenhull Platts but decided not to use. After a bit of a play I was able to construct a small base and add some detail around the side to hide what’s underneath. The van body will be part of the railway stores, I had thought ticket office but I have another idea for that. The roof has had masking tape and corrugated plastic stuck on to resemble an in need of repair look that will get a heavy weathering. There will also be the remains of an old narrow gauge turntable next to it and some old joeuf curved sections of track plied for the railways long abandoned extension. It should look abit like an allotment with junk everywhere, No offense to allotment owners intended. I have included a few shots of the layout and the construction of the new stores block
Those of you with a keen eye will notice I have a tree. It’s the first one that worked! the others are in the bin. After struggling with wire and clay I found a Britains tree one of 3 on ebay that became the armature for flocking. It needs some more work but has saved me hours of frustration. Oh the plastic base will go when I inset a peg into the board.
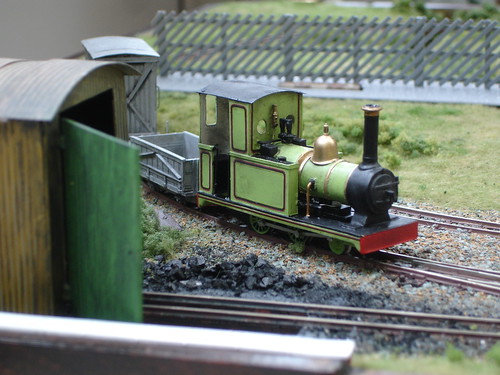
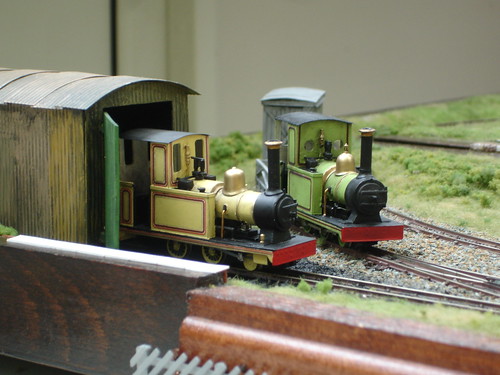
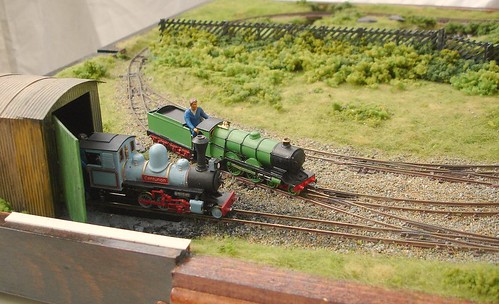
The last photo shows a newly lined but slightly weather Sealion and Polar Bear. I still need to detail them up more but I am slowly getting there. Tonight I hope to name the layout (build a sign) paint the covered van body and associated bit for that area. I also have a Christmas cracker steam locomotive whistle that’s going to become something rather strange on the station…. Will post progress tomorrow
Thanks everyone for your kind words it's spurred me on to get things finished and maybe begin something new! Just a few quick replies, I have the tender locomotive in the workshops getting a new body and a paint job, I hope to finish this over the next couple of weeks if I can Ravenforth. To Invercloy,
I am happy to exhibit the layout but only when its finished and I have ironed out any bugs( many I am sure) With regards to the transfer work I will do a full write up on my workbench and include some pictures of the other lined engines. Thanks again to all of you for you comments, I do feel quite chuffed with the compliments, it really means alot
Today I had a break from all things work related and headed into Wales for some narrow gauge inspiration. I called in at the Fairbourne railway, Talyllyn, Corris and lastly Bala. What a steam fix even if it was wet and quite cold. I have some new ideas for locomotives for this layout and perhaps even the begins of a new project..... but that must wait.
The first two pictures show the painted hut/stores building and the scenic break between the two boards. All the structures have been given a good weathering and then plenty of shrubs and plant matter added to base them in the landscape
I managed to get some images of progress to date. The station now has a fence and a name board titled 'Clutter Box'. The tree has been rooted to the ground and given some extra cover to hide its base and then everything else has been trial fitted. The next job will be ensuring everything fits seamlessly and begin detailing up the different areas. The station now has a steam locomotive planter that will eventually be adorned with many different flowers, failing that it may be shoved behind the stores building and partially tarpaulined over.

With all this new found enthusiasm I feel its about time I began rethinking the stock for this little layout. Below I have listed the new wants list that I will begin building off and on over the next few months or when I find a suitable chassis!
1. Fairbourne Sherpa (Thanks Colin I still have your pictures) bachmann chassis
2. Basset Lowke 4 wheeled carriages x 3
3. Steam outline diesel, similar to ones found at Butlins kato chassis
4. Basset Lowke or Rhyl 4-4-2 tender locomotive ?
5. L&B railway Lyn/Fairboune locomotive Bachmann Chassis
6. Small diesel hunslet maybe Kato
7. Some more wagons
Still left to finish is an American style 2-6-0 tender loco, Sean Lion mkII, A bagnall 0-4-2 Anne GGR and about 3 wagons and 4 coaches. I also thought I might tackle Walrus and Dolphin from the GGR and maybe the battery electric Polar Bear. Nothing like a list to keep oneself busy!
I have finally been able to get some pictures taken of the layout so far before the sun went in. Plenty more to do but things are progressing well
No comments:
Post a Comment